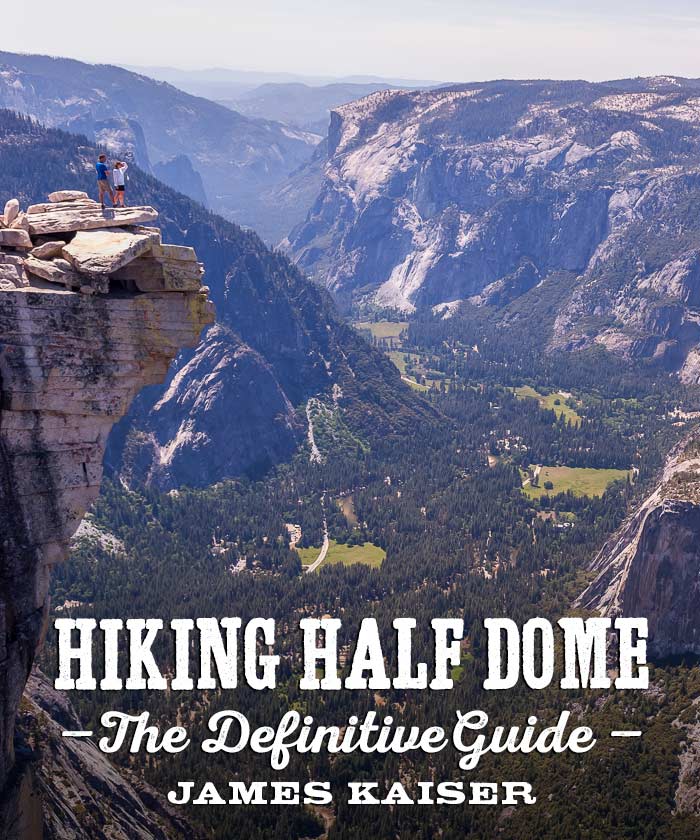
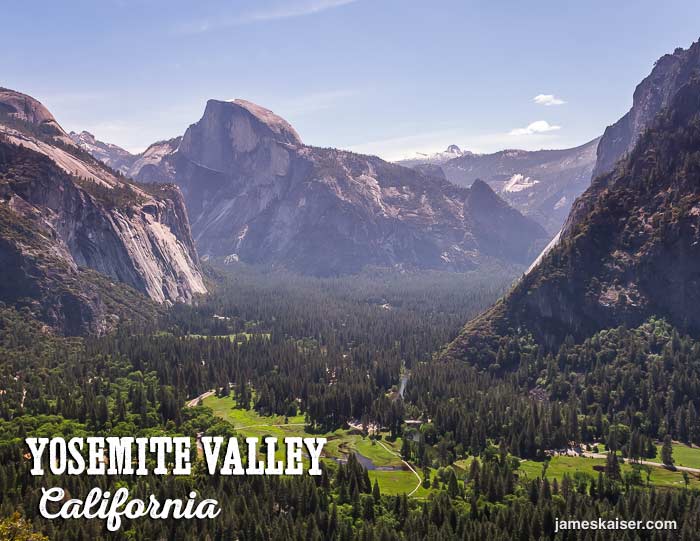
Half Dome is the best hike in Yosemite National Park. Rising 4,800 feet above Yosemite Valley, it beckons every hiker who sets eyes on it.
The trail is challenging. The waterfalls it passes are gorgeous. The final ascent is heart-pounding. And the views from the top are glorious.
But hiking Half Dome is not for everyone.
Starting from Yosemite Valley, the trail to Half Dome’s 8,839-foot summit is 14.2 miles long (21.7 km). Excellent hikers can summit in 5-6 hours. Mere mortals (and those of us who savor the journey as much as the destination) split the hike into two days.
But forget the physical demands.
Conquering the permit process might be the hardest challenge of all!
I’ve hiked Half Dome multiple times while researching my bestselling guidebook, Yosemite: The Complete Guide. Here I’ll cover the most important details — and share my best tips, including top strategies to obtain a permit.
Hiking Half Dome
Table of Contents
1. A Brief History of Half Dome
2. Hiking Routes
3. The (In)Famous Half Dome Cables
4. The Summit
5. Half Dome Permits
6. Overnight Camping
7. Best Months to Hike Half Dome
8. Death on Half Dome
9. Saftey Tips
10. What to Pack
Official Park Video
Yosemite National Park made a short hiking Half Dome video. About 10-minutes long, it covers the basics, with an emphasis on safety.

A Brief History of Half Dome
Before we get to the hiking details, let’s take a moment to appreciate the rich history of this geologic marvel.
Half Dome Geology
The story began 80 million years ago, when giant plumes of magma rose under present-day Yosemite. Before reaching the surface, the magma stopped rising and cooled into granite. Millions of years later, erosion revealed those granite plumes, one of which was Half Dome.
What happened to the other half of Half Dome?
The short answer is glaciers. During the last Ice Age glaciers flowed past Half Dome, scraping away lower elevation rocks. This caused higher elevation rocks to tumble away, leaving behind a sheer vertical face.
But — and this is very important — glaciers never flowed over Half Dome. Its rounded top is the result of concentric rock layers eroding away, like layers peeled off of an onion.
Finally — to really mess with your head — Half Dome is not, in fact, half of a dome. That’s an optical illusion from Yosemite Valley. It’s actually more like three-quarters of a dome.
You’ll see when you hike it.
First Ascent and Early Hikers
George Anderson
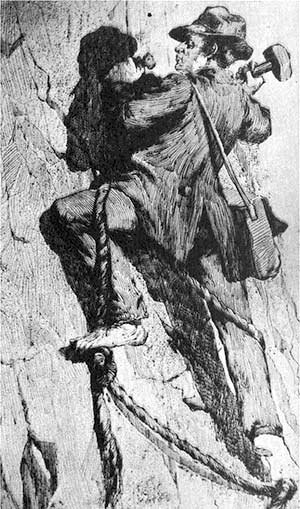
As far as we know, members of Yosemite’s Ahwahneechee tribe never reached the summit of Half Dome.
In 1868 California state geologist Josiah Whitney confidently declared that Half Dome was “probably the only one of all the prominent points about the Yosemite which never has been, and never will be, trodden by human foot.”
Not surprisingly, attempts to climb it were soon underway. Any decent hiker could reach the backside of Half Dome, but the final 400-foot, 45-degree ascent was simply too steep to hike.
Half Dome Hiking Routes
There’s only one route up the backside of Half Dome. But there are multiple approaches to the backside. Most people follow the classic route from Yosemite Valley. You can also start from Glacier Point, which reduces total elevation gain. Or, if you’re really looking for an adventure, you can hike to Half Dome from Clouds Rest.
Important note for day hikers: No matter which route you take, start your hike at dawn (or just before dawn). Start any later and you risk hiking home in the dark.
Looking for a Color Topographic Half Dome Hiking Map?
There’s one in Yosemite: The Complete Guide!
Yosemite Valley to Half Dome Route
Distance: 14.2 miles (22.7 km), round-trip.
Trailhead: Happy Isles shuttle stop in Yosemite Valley
Elevation Change: 4,800 feet (1,463 meters)
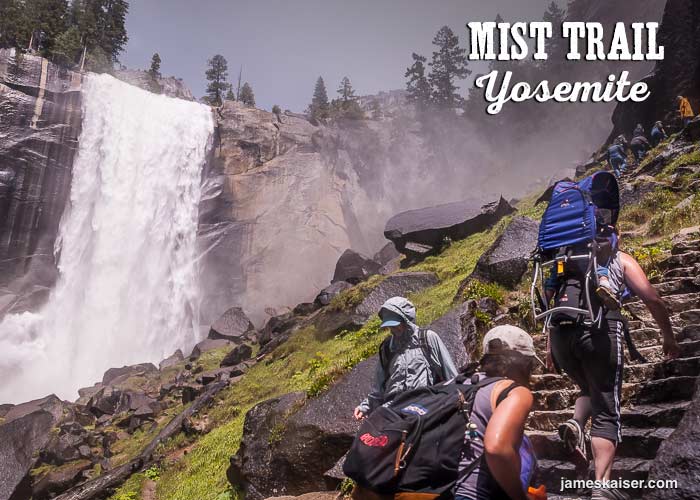
Most Half Dome Hikers start and finish the hike in Yosemite Valley (elevation 4,000 feet). This route follows the popular — and crowded — Mist Trail to the top of Vernal Fall (elevation 5,000 feet), then continues to the top of Nevada Fall (elevation 5,971 feet).
From Nevada Fall you’ll hike along the banks of the Merced River to Little Yosemite Valley Campground (elevation 6,150 feet), where backpackers can spend the night. Just north of Little Yosemite Valley, the trail heads 7 miles (11.2 km) to Half Dome’s steep backside. The final push heads up Sub Dome, then follows Half Dome’s cables to the summit (see below).
An alternate route bypasses the Mist Trail in favor of the John Muir Trail, which converges with the classic route at the top of Nevada Fall. This route is slightly longer, but the elevation change is more gradual, and there are fewer crowds. It adds 1.1 miles (1.8 km) each way, for a total route of 16.5 miles (26.5 km) round-trip.
You can also combine the two routes. Follow the Mist Trail on the way up, then follow the John Muir Trail on the way down. This route measures 15.4 miles (24.8 km) round-trip.
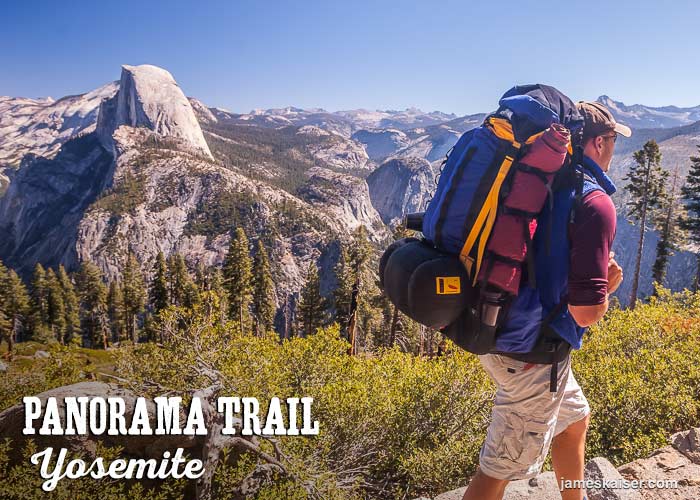
Glacier Point to Half Dome Route
Distance: 20 miles (32 km), round-trip
Trailhead: Glacier Point
Elevation Change: 3,000 feet (914 meters)
This route starts at Glacier Point, an viewpoint perched 3,000 feet above Yosemite Valley. Starting at this higher elevation means less total elevation gain. From Glacier Point you’ll follow the Panorama Trail to the top of Nevada Fall, then hook up with the classic route (above).
From Glacier Point (elevation 7,200 feet) the Panorama Trail descends 1,400 feet (423 meters) to Illilouette Falls (elevation 5,800 feet). It then ascends 400 feet (122 meters) to Panorama Point (elevation 6,200 feet), then descends 230 feet to Nevada Fall. Despite the ups and downs, you’ll still save 1,800 feet (549 meters) of total elevation change versus the classic route starting from Yosemite Valley.
The biggest downside to hiking Half Dome via the Panorama Trail is finishing the long, round-trip hike with a 1,400-foot uphill slog to Glacier Point.
Another option is starting at Glacier Point, hiking to Half Dome, then following the classic route to Yosemite Valley. The only issue is logistics. If you park at Glacier Point and finish in Yosemite Valley, you’ll need to get back to your car.
If you’re hiking with friends, you can shuttle back and forth with two cars. A better option is to buy a one-way ticket on the Glacier Point Tour Bus. Buses depart Yosemite Valley for Glacier Point at 8:30am, 10am and 1:30pm.

Clouds Rest to Half Dome Route
Distance: 11.5 miles (18.5 km), one-way
Trailhead: Tenaya Lake
Elevation Change: 1,780 feet (542 meters)
From the top of Half Dome, looking northwest, a distinct peak towers like a pyramid of sparkling granite. That peak is Clouds Rest. Rising 1,000 feet higher than Half Dome, it boasts equally spectacular views.
If your legs are up for it, you can summit Clouds Rest and Half Dome. Few Yosemite hiking routes pack more bang for your buck. And few will wear you out faster.
If you’re an experienced backpacker in terrific shape looking for jaw-dropping scenery, this is an amazing route.
Just don’t attempt it as a round-trip in one day. Plan on summiting Clouds Rest and camping in Little Yosemite Valley on day one, then summiting Half Dome on day two.
The trail to Clouds Rest starts at Tenaya Lake (elevation 8,150 feet, 2,484 meters) off Tioga Road. From the trailhead you’ll hike 7.2 miles (11.6 km) and ascend 1,780 feet (524 meters) to Clouds Rest’s spectacular 9,930-foot (3,027-meter) summit. To the northeast you’ll enjoy sweeping views of the High Sierra. To the southwest you’ll see Half Dome rising like a granite monarch above Yosemite Valley.
From the Clouds Rest summit you’ll hike 11 miles (18 km) and descend 3,780 feet (1,152 meters) to Little Yosemite Campground.
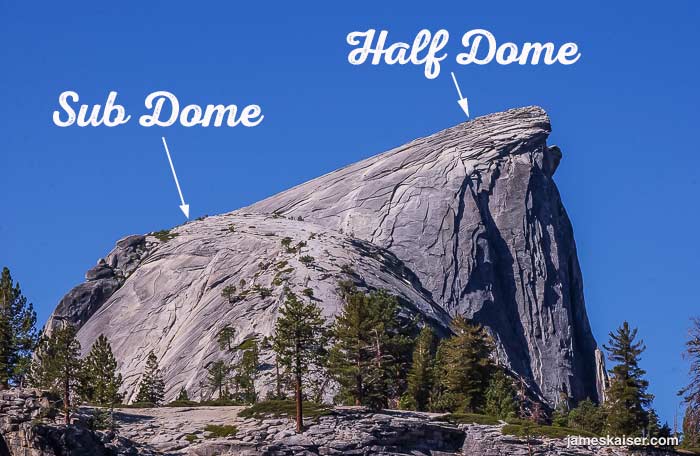
Sub Dome
No matter which route you take, everyone ends up on the backside of Half Dome. Before reaching the famous cables, however, you’ll need to ascend Sub Dome (aka Quarter Dome). This is also where park rangers check for Half Dome hiking permits — denying entry to those without a golden ticket.
Like the Mist Trail, Sub Dome has hundreds of stone steps. But it’s even more challenging due to the 8,000-foot elevation. This oxygen is much thinner at this elevation.
Pace yourself. Take frequent breaks if you feel tired. The hardest part is yet to come.
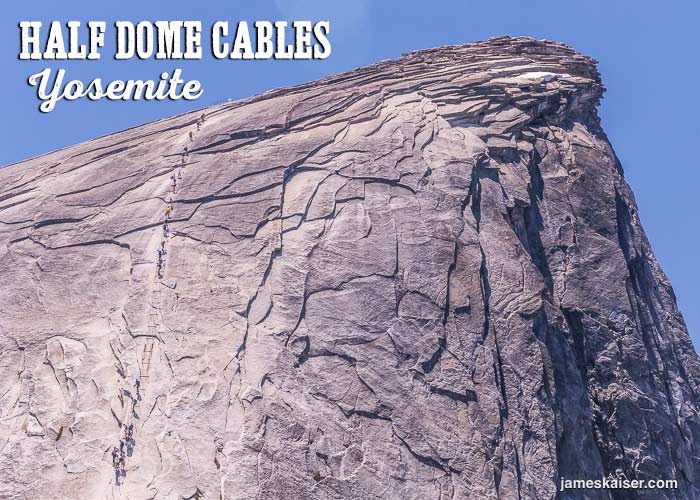
Half Dome Cables
Once at the top of Sub Dome, there’s only one way to the summit: the legendary Half Dome cables.
Half Dome’s final 400-foot ascent heads up bare granite inclined between 45 and 60 degrees. It’s too steep to hike without falling, so the park service employs a unique metal cable system. This puts the summit within reach of regular hikers.
Here’s how the cables work:
Each spring the park service inserts steel poles into holes drilled at roughly 10-foot intervals. The poles are then strung with metal cables spaced roughly 30-inches apart. This is small enough to grasp each cables with both hands, but large enough to let two people to squeeze past one another.
Wooden boards are laid flat between each set poles, offering hikers solid footholds.
At the end of each hiking season, the park service takes down the cables to prevent winter damage. The park service then re-installs the cables again the following spring. Exact dates depend on snowpack, but Half Dome’s cables are generally in place from late May to early October.
Yosemite’s Current Conditions Website provides current updates on Half Dome’s cables. Scroll down to “Trails and Wilderness”
Are Half Dome’s Cables Dangerous?
According to Yosemite’s official website: “Since 1919, relatively few people have fallen and died on the cables.”
Doesn’t exactly inspire confidence.
But it is an accurate statement.
Yes, some people have died on Half Dome’s cables. But also remember that tens of thousands more have ascended the cables with no problem whatsoever.
If you’re smart and take proper precautions, you’ll be just fine.
Some things to consider:
• Most injuries on the cables occur when then rock is wet. After it rains both the rock and the cables become incredibly slippery.
• Wear hiking boots with terrific grip – not tennis shoes or sneakers!
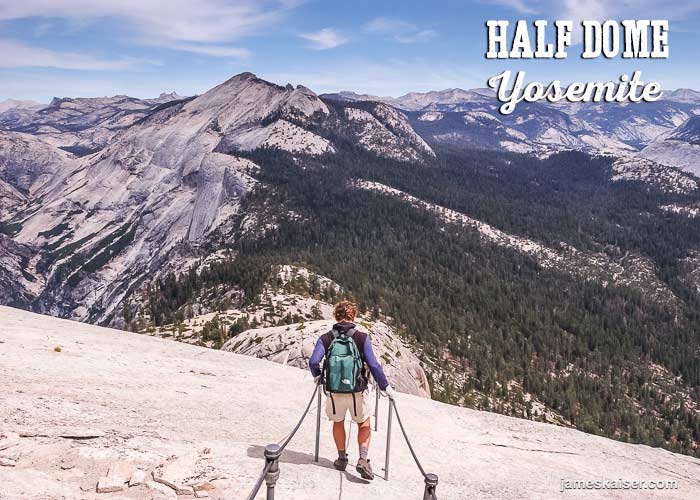
• It’s harder going down the cables than going up. The steep nature of the cables is far more apparent when facing down, and this can be intimidating. The upside: breathtaking views.
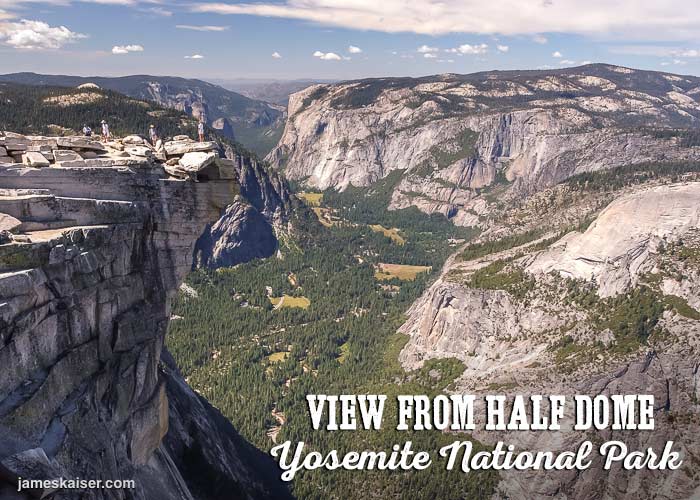
Half Dome’s Summit
You’ve climbed the cables. You’ve reached the summit!
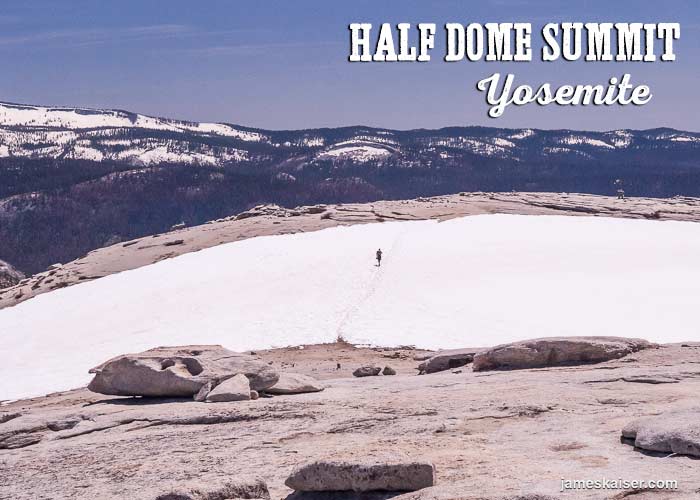
What’s on top?
Half Dome’s summit is a vast, mostly flat surface about the size of 17 football fields. In spring there might still be snow fields lingering on the summit.
You’ll likely see chipmunks and marmots. Watch out – Half Dome’s fat marmots are experts at looking cute in exchange for free handouts. Don’t feed them. It’s against the rules, and the last thing you need is a throbbing, bloody finger when descending the cables.
If you’re lucky, you might spot the rare Mount Lyell salamander.
Seven small trees once grew on the summit, but six were chopped down for firewood by overnight campers. (Overnight camping on Half Dome was banned in 1993 due to the large amount of human waste it generated.) Today just one small tree remains.
Half Dome Permits
Getting a Half Dome hiking permit is like winning the lottery. Literally. You actually need to win a lottery to get a hiking permit.
There once was a time (pre-2010) when anyone could hike Half Dome whenever they wanted. No permits were necessary.
It sounds beautiful, I know. But on busy summer weekends up to 1,200 people hiked Half Dome, and the cables became crowded and dangerous. Changes ultimately became necessary.
In 2010 Yosemite National Park began requiring permits to hike Half Dome. No permit, no Half Dome. Period. The total number of Half Dome hikers is now capped around 300 per day – 225 day hikers, 75 backpackers.
Getting a permit is hard — and it’s getting harder every year. But the number of deaths and injuries on Half Dome’s cables has fallen since the permit system was established.
Day Hiking Permits
If you want to hike Half Dome round-trip in a single day, your best option is to enter the Pre-Season Half Dome Day Permit lottery. The application period is March 1 to March 31. Lottery results are announced via email in mid-April.
If you missed the pre-season lottery — or applied but didn’t receive a permit — you can also apply for the “Daily Lottery.” Approximately 50 Half Dome day hiking permits are available each day during hiking season.
Daily Lottery applications open two days before the planned hike. That is, for a Sunday hike you would apply on Friday. Applications are accepted between midnight and 1pm. Notifications are sent out later that night.
You can apply for the daily lottery on recreation.gov, or by calling 877-444-6777.
There is a $10, non-refundable fee to apply for a Half Dome day hiking permit.
If you receive a permit, there is an additional $10 per person fee (refundable if you cancel).
Half Dome Day Hiking Permit Statistics
Yosemite National Park publishes helpful Half Dome day hiking permit statistics. Here’s the summary:
• In 2016 over 26,000 people applied for pre-season Half Dome day hiking permits. Only 24% got permits. Weekend success rate: 3.4% ; Weekday success rate: 10%
• In 2016 over 24,000 people applied for “Daily Lottery” Half Dome day hiking permits. Only 23% got permits. Weekend success rate: 12% ; Weekday success rate: 31%
• Success rates are lowest in early spring — and highest in late fall.
• The lowest success rates are weekends in July and August.
• The number of permit applications has been climbing steadily each year. As a result, the permit success rate has been declining steadily each year.
Visit the Yosemite National Park website for more information on Half Dome day hike permits.
Backpacking Permits
Want to spend two days hiking Half Dome? You’ll need a Half Dome backpacking permit, which is different from a Half Dome day hiking permit.
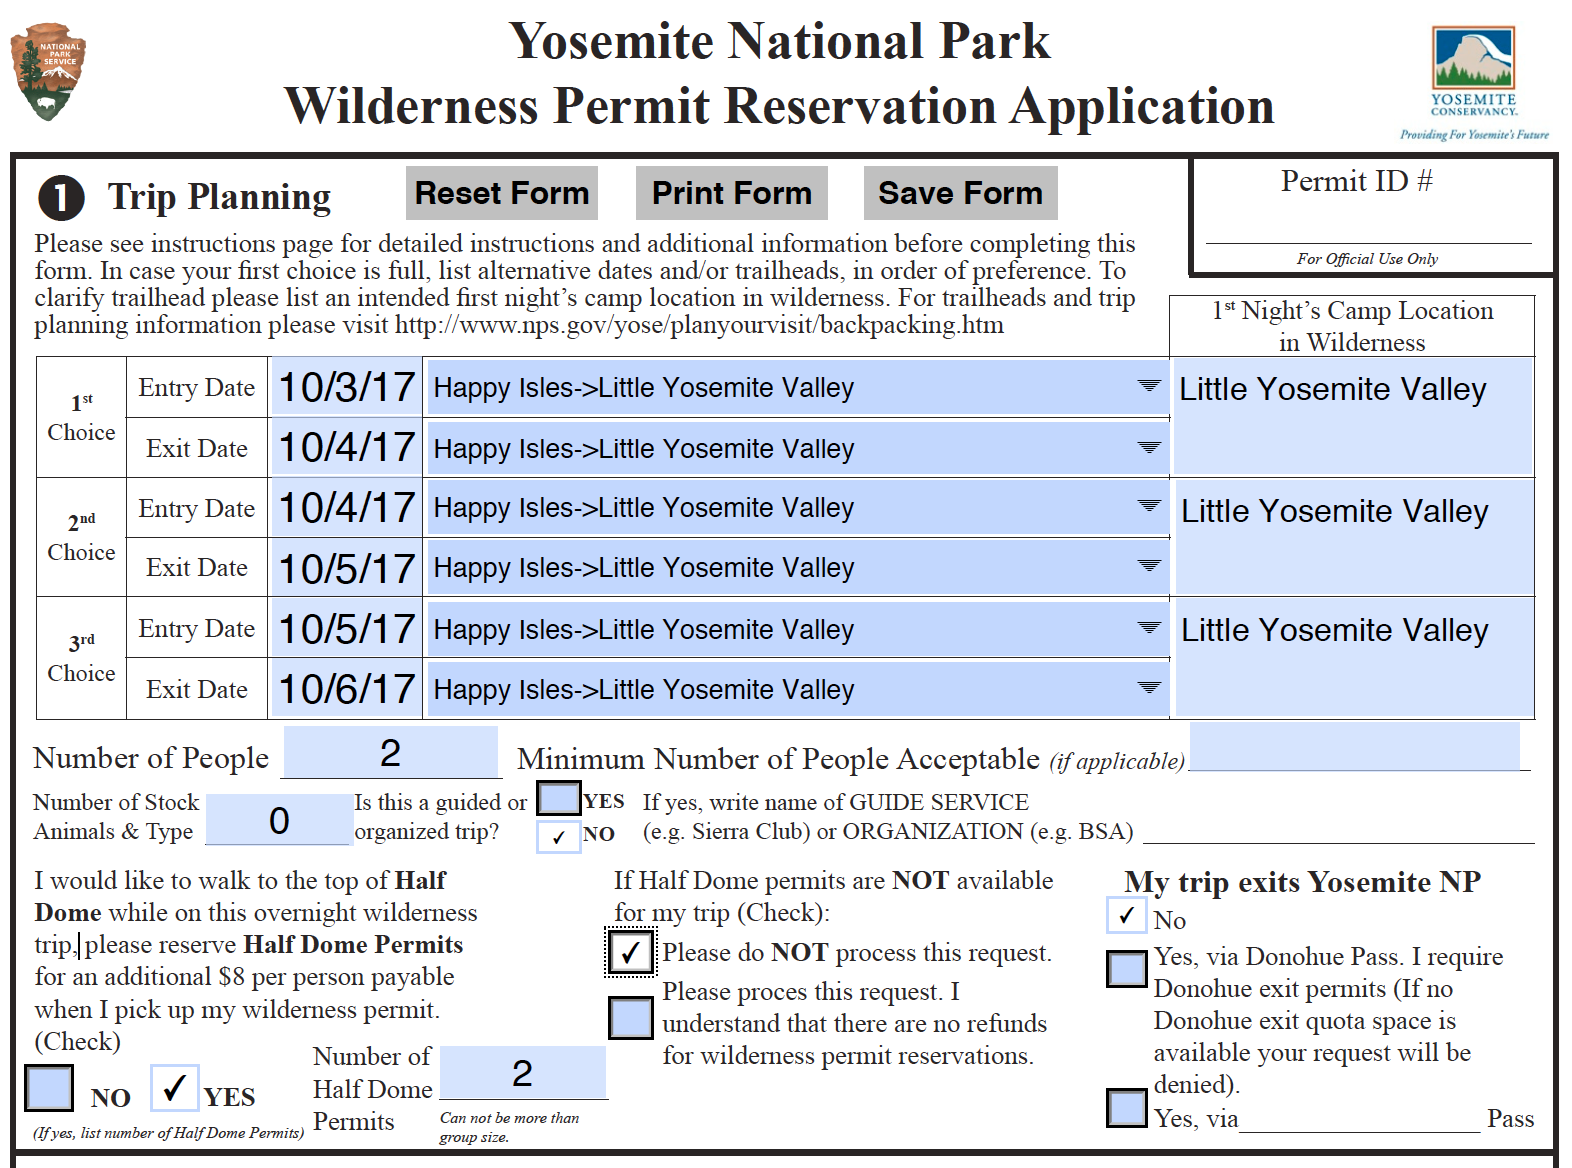
Instead of entering a lottery in March, you’ll apply for a wilderness permit. This is the same wilderness permit required for all overnight backpacks in Yosemite, but you’ll need to specify that you also want Half Dome permits.
Download the form, then fill out your top three choices.
“Entry Date” and “Exit Date” refer to entry/exit into Yosemite’s wilderness. In other words, the starting day and finishing day of your backpack.
“Entry Trailhead” and “Exit Trailhead” refer to where you will start and finish your backpack. For most people, this means the following three trailheads:
• Happy Isles to Little Yosemite Valley (LYV) – i.e. Yosemite Valley
• Glacier Point to Little Yosemite Valley (LYV) – i.e. Glacier Point
• Sunrise Lakes – i.e Tenaya Lake
Next, check “Yes” under the section that states “I would like to walk to the top of Half Dome while on this overnight wilderness trip.” Then enter the number of Half Dome permits you want. Next, mark whether you do or do not want this wilderness permit application to be processed if Half Dome permits are not available.
Here’s an example from a Wilderness Permit Reservation Application I personally submitted. (I got the permits!)
When to apply for Half Dome Backpacking Permits
You can submit your Wilderness Permit Application 24 weeks (168 days) in advance. Most Half Dome Wilderness Permits are gone the first day they become available, so you’ll want to submit your application EXACTLY 168 days in advance.
Here’s a helpful chart that links proposed hiking dates tp the date you’ll want to submit your application.
There are three ways to submit your application: fax, phone or mail.
Believe it or not, fax is the best way to submit your application. Faxed requests are processed before phone requests. You can also mail your application, but if it arrives more than two weeks in advance of the earliest reservation date it will not be accepted.
If you provide an email, you’ll receive confirmation within 24 hours. If you don’t provide an email, you’ll be notified by regular mail within two weeks.
First-come, first-served Backpacking permits
Didn’t get an advance wilderness permit? You can still apply for a first-come, first-served backpacking permit when you visit the park.
Each day Yosemite offers 12 first-come, first-served permits for Happy Isles to Little Yosemite Valley, 4 for Glacier Point to Little Yosemite Valley, and 6 for Sunrise Lakes (Tenaya Lake trailhead).
First-come, first-served wilderness permits are available at one of Yosemite’s Wilderness Permit Stations. Permits become available at 11am, but the line often forms early in the morning.
According to the park service: “Priority for permits for a particular trailhead is given to the closest permit issuing station, though it is possible to obtain a permit for any trailhead at any permit issuing station.”
What to do if you don’t get a Half Dome permit
If you didn’t get an advance permit, and you don’t like your chances of getting a daily lottery or first-come, first-served wilderness permit, there is one more option:
Pay for a guided Half Dome hike.
The Yosemite Conservancy (the nonprofit partner of Yosemite National Park) offers guided Half Dome backpacks in July and August. They secure the permits and offer expert guidance.
Overnight Camping at Little Yosemite Valley Campground
If you’re fortunate enough to get a Half Dome wilderness permit, you’ll spend the night at Little Yosemite Valley Campground. Located near the banks of the Merced River at 6,150 feet (1,870 meters), this is a terrific campground located roughly halfway between Yosemite Valley and Half Dome.
Little Yosemite Valley campground has composting toilets and metal lockers to keep your food and scented items safe from bears. Campfires are only permitted in the two communal campfire rings. Water is available from the Merced River, but you need to treat the water or filter it before drinking.
Learn more about Little Yosemite Campground
Best Months to Hike Half Dome
Spring (May, June)
This is my favorite time to hike Half Dome. (And judging by the high number of permit requests, everyone else’s.) The waterfalls are roaring, the crowds are relatively low, and the weather is great for hiking. The only question is when the cables go up. If the previous winter was snowy, the cables might not go up until June. If you were lucky enough to secure a May permit, you’ll get a refund, but losing the chance to hike Half Dome will hurt.
Summer (July, August)
Summer is, in my opinion, the worst time to hike Half Dome. The waterfalls have slowed to a trickle and the low elevation crowds are crushing. Once above Nevada Fall, however, the crowds and temperatures are far more pleasant. Summer is the best time to camp at Little Yosemite Valley, which can be chilly in the spring and fall.
There’s also the risk of summer thunderstorms. The Sierra Nevada Mountains are famously sunny and dry in summer, but monsoons sometimes arrive from the east. When they cross the crest of the Sierra violent thunderstorms appear, often with little warning. If you see a thunderstorm anywhere on the horizon, cancel your plans to summit Half Dome (see Death on Half Dome below).
Fall (September, October)
Fall is a great time to hike Half Dome. After Labor Day the crowds thin out, and daytime hiking temperatures are often divine. The only downside is the lack of water in the waterfalls, and chilly nighttime temperatures if you’re backpacking. The biggest upside: late fall gives you the best chance of securing Half Dome hiking permits.
Death on Half Dome
There have been over 20 recorded deaths on Half Dome. This book describes some of those stories in detail.
In 1972 a hiker on top of Half Dome took refuge from a lightning storm in a small cave. He was killed when lightning struck the cave.
In 1985 a group of young hikers ascended the cables during a lightening storm and sought refuge in the same cave. Lightning struck the cave again, killing one hiker and sending another into seizures that propelled him off the sheer northwest face.
Five people have died while ascending or descending the cables. Most of these deaths occurred when the granite was slippery and wet.
Other causes of death on Half Dome include suicides (6), falls while rock climbing (4) and unsuccessful BASE jumps (2).
Safety Tips
Watch your Step
Slipping on wet rocks is one of the most common reasons for Search & Rescue calls. Be extremely careful when climbing the Mist Trail, especially in spring when Vernal Fall is at its peak. Other areas of concern are Sub Dome and the Half Dome cables when they are wet.
Stay Hydrated
It takes at least four liters of water to hike Half Dome. Many hikers don’t bring enough water, and they suffer from dehydration. Staying well-hydrated is one of the simplest physical and mental performance boosters.
Look for Thunderstorms
Thunderstorms can quickly descend on Yosemite — and Half Dome is basically a 8,839-foot lightning rod.
You DO NOT want to be trapped on the summit, or on Half Dome’s metal cables, during a storm. People have died due to lightning strikes.
If you see a thunderstorm anywhere on the horizon, don’t climb Half Dome’s cables. It’s not worth the risk.
Tip: Sierra Nevada thunderstorms often arrive in the afternoon. Try to reach the cables before noon. And be sure to check the weather forecast before your hike.
Don’t swim in the pools above Vernal Fall and Nevada Fall
This should be obvious. But every couple of years someone swims in the pools above the waterfalls and is swept to their death.
What to Pack
Water – It takes about four liters of water to hike Half Dome. If you don’t want to haul that much water, bring a water filter and fill up along the way. Note: the Merced River above Nevada Fall and near Little Yosemite Valley are the last places to fill your water bottle.
Food – You’re going to burn a lot of calories on a Half Dome hike. Make sure you pack plenty of food and snacks. This is not the time to go on a diet.
Hiking Boots – Not sneakers or tennis shoes. You want footwear with strong ankle support and excellent grip on rocks. This is especially important on the Half Dome cables.
Gloves – Although it’s possible to ascend the Half Dome cables without gloves, it is far more pleasant to ascend the cables with gloves. The rugged canvas gloves you buy at hardware stores work quite well.
Headlamp or Flashlight – It takes, on average, 12 hours to hike to the top of Half Dome and back. Many people underestimate this time, start late, and find themselves hiking back in the dark. Hiking at night without a headlamp or flashlight is extremely dangerous.
Extra Layers – Summer temperatures can be hot, but the higher you climb, the cooler it gets, and thunderstorms can happen anytime. Pack extra layers just in case.
Whistle – Accidents happen, but if you pack a whistle Yosemite Search & Rescue can easily find you.
Trash Bag – You’ll need to pack out all your trash, so pack a small plastic bag.
Order Yosemite: The Complete Guide
The bestselling guidebook to Yosemite.Full-color and filled with insider tips.Plan the ultimate Yosemite adventure!